Give Happiness Scarf Pattern
Creating this scarf gave me happiness. I hope it makes you smile when you make and wear it too.
This pattern consists of the scarf, the optional flowers sewn onto the scarf and fringe tassels. The patterns and instructions are all included here. You can also download a free PDF handout of the pattern with photos and instructions.
Please consider donating to my fundraising pages as I rely on donations to keep going.. You can donate via GoFundMe or PayPal. Your support is appreciated!
| give_happiness_scarf.pdf |
Notes:
Level of difficulty: Easy+
This is much like 'V stitch' or double V stitch and is simple once you get the hang of it.
Time: I made this over 3 days, I am not a very fast crocheter, so if you are you might finish it in a day.
Yarn weight
I used a medium weight yarn also known as Worsted, Aran or an Australian equivalent of 10-12 ply.
The pink yarn is Lion Brand Heartland in Denali. It is a soft silky acrylic in rosy pink with flecks of white. It is a 5oz or 142g ball, 251 yards or 230 metres long. I used every scrap of it to complete the scarf.
Amount of yarn
The optional extra flowers and tassels can be made in the same or different colours. If you use the same you would need 2 balls of Heartland or approximately 200g of yarn.
If you use a second colour you will need 142g of a main colour and 50g in a second colour to complete the 4 or 6 flowers and tassels.
Gauge is not important for this pattern.
Extras
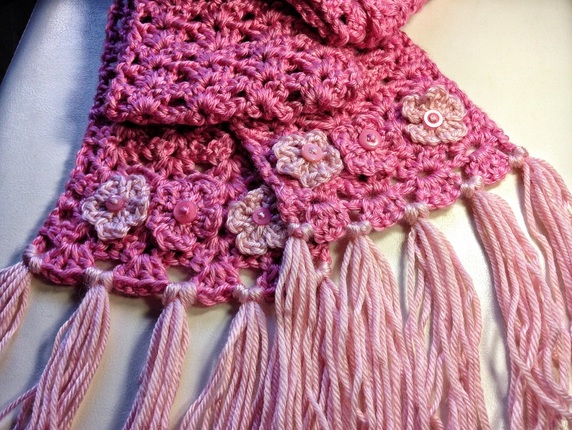
6 small buttons for the flowers (mine are 1-1.2cm in diameter)
Yarn or tapestry needle to sew flowers to the scarf
Sewing needle to sew buttons to flowers
7mm hook to crochet starting chain
5.5 or 6mm hook to crochet rest of scarf
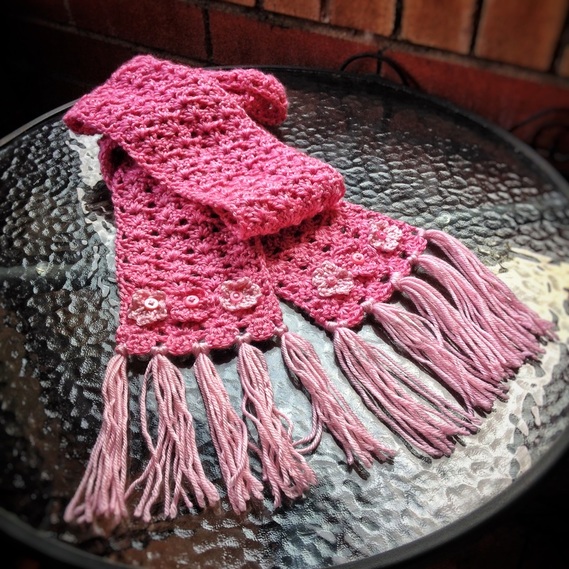
The finished scarf is 12cm wide by 150cm long not including tassels.
Abreviations - US terms
Ch – chain
Dc – Double crochet
Ss – Slip stitch
St – Stitch
Sp - Space
Level of difficulty: Easy+
This is much like 'V stitch' or double V stitch and is simple once you get the hang of it.
Time: I made this over 3 days, I am not a very fast crocheter, so if you are you might finish it in a day.
Yarn weight
I used a medium weight yarn also known as Worsted, Aran or an Australian equivalent of 10-12 ply.
The pink yarn is Lion Brand Heartland in Denali. It is a soft silky acrylic in rosy pink with flecks of white. It is a 5oz or 142g ball, 251 yards or 230 metres long. I used every scrap of it to complete the scarf.
Amount of yarn
The optional extra flowers and tassels can be made in the same or different colours. If you use the same you would need 2 balls of Heartland or approximately 200g of yarn.
If you use a second colour you will need 142g of a main colour and 50g in a second colour to complete the 4 or 6 flowers and tassels.
Gauge is not important for this pattern.
Extras
6 small buttons for the flowers (mine are 1-1.2cm in diameter)
Yarn or tapestry needle to sew flowers to the scarf
Sewing needle to sew buttons to flowers
7mm hook to crochet starting chain
5.5 or 6mm hook to crochet rest of scarf
The finished scarf is 12cm wide by 150cm long not including tassels.
Abreviations - US terms
Ch – chain
Dc – Double crochet
Ss – Slip stitch
St – Stitch
Sp - Space
Instructions
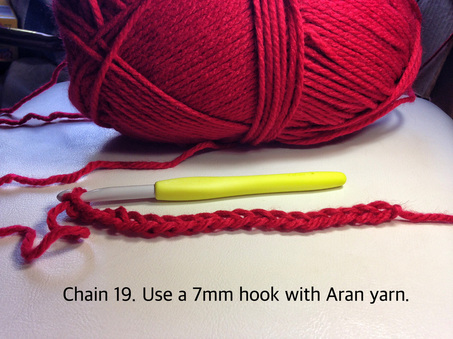
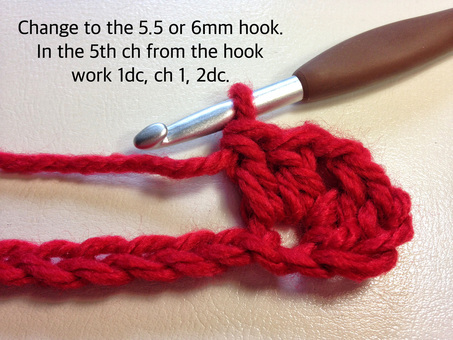
Ch 19 using the 7mm hook. Change to the 5.5mm or 6mm hook.
Row 1
In the 5th ch from the hook work 1dc, ch 1, 2dc.
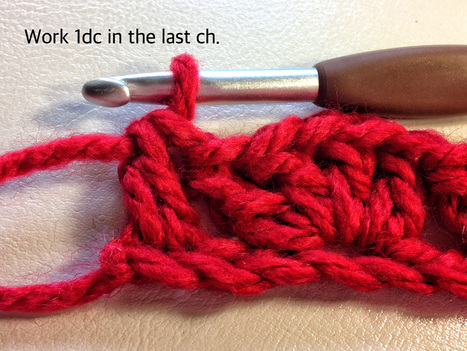
* Skip 3ch. Work 2dc, ch 1, 2dc in the next ch.* Repeat from * to * 3 more times until you have only 2ch remaining in your starting ch.
Skip 1ch, work 1dc in the last ch.
Row 2
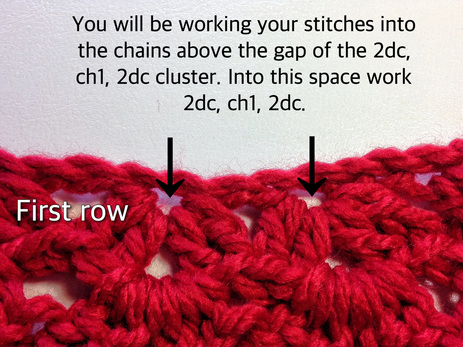
Ch 3. *In the ch1 gap between dcs in the previous round work 2dc, ch1, 2dc. Skip 4 sts.*
Ch 3. *In the ch1 gap between dcs in the previous round work 2dc, ch1, 2dc. Skip 4 sts.*
Repeat from * to * to the last 2dc. Skip the last 2 decades and work 1dc in the last st.
Row 3 - 97
Repeat row 2 instructions until the scarf is approximately 147cm or 63 inches. Finish off and weave in ends.
New 'Row 1’ or Last Row of the Scarf
The first row has a straight line and is not decorative in the way the last row is so we will add a row to the beginning of our scarf, thereby making a new row 1.
Ss into the top st of the first row. Ch3.
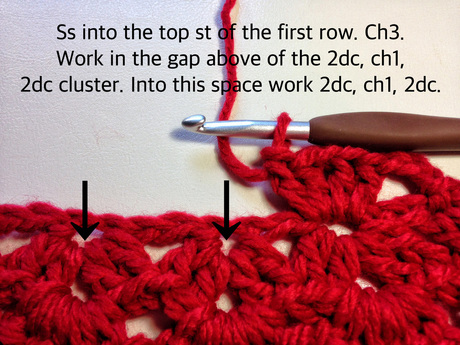
Remember, you will be working your stitches into the chains above the gap of the 2dc, ch1, 2dc cluster.
Into this space work 2dc, ch1, 2dc. Skip the chains between and work 2dc, ch1, 2dc in the remaining 3 gaps above the previous row 1 clusters.
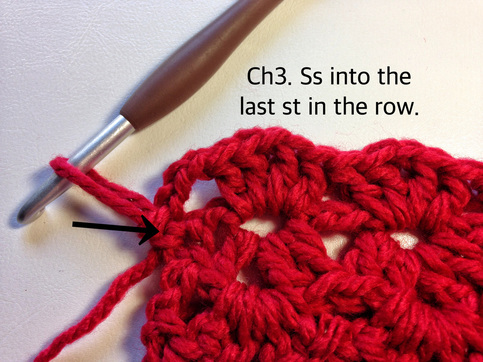
Ch3. Ss into the last st in the row. Finish off. Weave in ends.
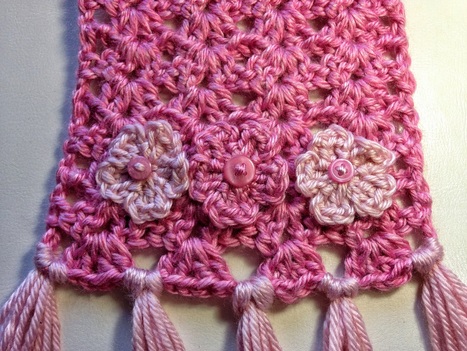
Simple Flower
Abreviations - US terms
Ch – chain
Dc – Double crochet
Ss – Slip stitch
St – Stitch
Sp - Space
Abreviations - US terms
Ch – chain
Dc – Double crochet
Ss – Slip stitch
St – Stitch
Sp - Space

Ch 3. Ss into the first ch to make a ring.
* Ch 3. Into the ring work 1dc, then ch 3 and ss into the ring. *
Repeat from * to * 4 more times to create 5 petals.
Finish off, leaving a long tail to sew the flower to the scarf.
Crochet as many flowers in the colours you want to decorate the scarf.
Sew a button to the flower securely.
Sew the flowers to the scarf in the positions that please you.
Tassel Instructions
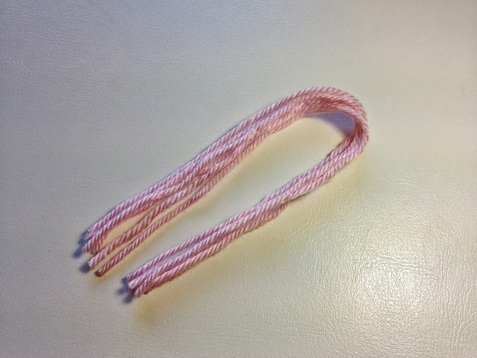
Cut 6 pieces of yarn 50cm long for each tassel.
Take one of your bundles of yarn and fold it in half length-wise.
Working from the backside of the scarf, insert your loops through the gaps along the edge as shown in the photo below.
Working from the backside of the scarf, insert your loops through the gaps along the edge as shown in the photo below.
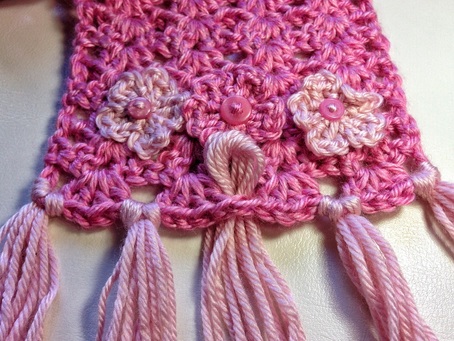
As you pull your loop through, be sure to keep your cut ends as even as possible.
Lift the loop and pull the ends of your yarn through it, making a tassel.
Lift the loop and pull the ends of your yarn through it, making a tassel.
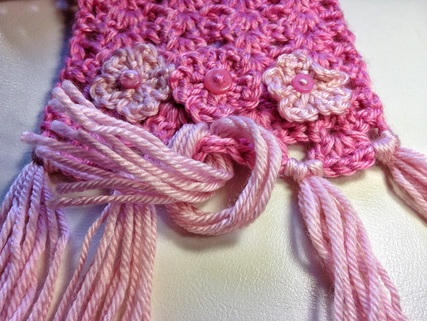
Pull the loop tight to make your tassel snug and secure.
Continue attaching tassels along your edge in this same manner. You can trim any uneven ends using a pair of scissors when you are done.
Continue attaching tassels along your edge in this same manner. You can trim any uneven ends using a pair of scissors when you are done.